Discovering moisture beneath your heating unit can be frustrating. Is it coming from a valve, a loose spindle, or a pipe joint? Learning how to identify the exact origin saves you time and protects your flooring. Here is how to pinpoint the leak and keep your home cozy and safe.
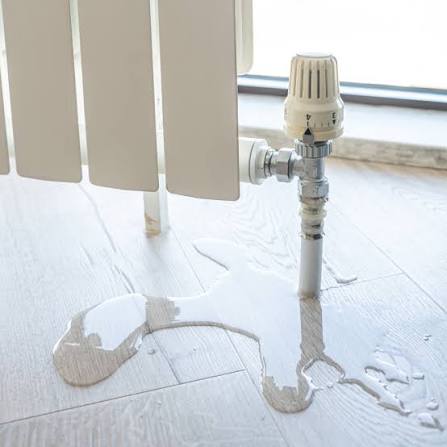
A puddle forming on your floor is a clear warning sign that your heating system needs attention. Dealing with a leaking radiator can feel overwhelming, especially when water appears without an obvious starting point. Beyond damaging hardwood or carpets, unnoticed moisture lowers system efficiency, forcing your boiler to work harder and driving up heating bills. Finding the exact source of water loss quickly prevents structural damage and restores proper heat circulation. Whether the issue stems from a loose valve, a worn gland packing, or a loose pipe joint, identifying the exact spot is the first essential step toward a reliable fix.
Essential Tools and Safety Prep Before Inspection
Before attempting to locate or fix any water leak, proper preparation prevents minor drips from escalating into major spills. Working with a central heating system requires caution due to high temperatures and pressurized water.
- Turn off your central heating system completely and allow all components to cool down to avoid risk of scalding.
- Lay down absorbent towels and place a small container beneath suspected leak areas to catch residual moisture.
- Keep an adjustable wrench, plumber’s PTFE tape, and clean paper towels nearby to dry and inspect each connection accurately.
Taking these precautionary steps keeps your workspace safe and ensures you can accurately identify where moisture is originating without mess.
Identifying the Source of Your Water Loss
Before applying any fix, dry the entire unit with a towel. Place fresh paper towels underneath each connection point to watch where drops first appear.
1. Radiator Valve Connections
The control valve regulates hot water entering the unit. Over time, internal seals degrade, leading to slow drips around the valve body or tailpiece.
- Check the compression nut connecting the valve to the unit.
- Wipe the area dry and inspect for fresh moisture forming at the threads.
- Gently tighten the union nut using an adjustable wrench if water trickles out.
If water continues to pool around the base, the valve itself may be corroded internally, requiring a complete component replacement.
2. The Valve Spindle
If water creeps up along the control stem when you turn the handle, the spindle is the likely culprit. This issue typically occurs around the valve gland.
When adjusting your temperature settings on a leaking radiator, water can escape through the gland packing if the internal seal has dried out or loosened. Tightening the gland nut clockwise a quarter-turn often stops the moisture from escaping without replacing the entire assembly.
3. Pipe Joints and Compression Fittings
Water pooling strictly at floor level usually points toward the pipe joint connecting your home plumbing to the heating system.
- Thermal expansion and contraction cause pipe fittings to loosen over time.
- Corrosion inside aged pipework can erode the seal at the joint interface.
- Applying plumber’s PTFE tape to exposed threads offers an effective temporary barrier.
Impact of Unchecked Moisture on Home Heating Efficiency
Ignoring even a small trickle beneath your heating unit can affect more than just the flooring and surrounding baseboards. Continuous moisture loss from a sealed central heating circuit can reduce system pressure, allowing air pockets to develop and restricting proper water circulation. As pressure drops, the boiler may need to run for longer periods, increasing overall household energy use. Trapped air within the radiator can also create cold spots, which may lead homeowners to raise the thermostat unnecessarily. Over time, ongoing moisture exposure can contribute to rust developing on external metal panels and nearby fittings. Maintaining the correct system pressure and addressing leaking or loose fittings promptly helps ensure heat is distributed evenly while keeping heating costs under control.
Knowing When to Repair vs. Upgrade
Minor drips at pipe connections can often be resolved with basic tools. However, persistent water loss caused by internal corrosion or age indicates a deeper structural problem. Old units lose heating efficiency, develop internal sludge, and strain your central boiler.
Replacing outdated heating units with modern, high-efficiency models eliminates recurring maintenance costs, improves heat distribution, and enhances overall comfort across your living space.
FAQs
Can a small drip cause major system damage?
Yes. Even minor water loss drops system pressure, causes boiler short-cycling, and damages flooring over time.
Why does water leak only when the heating turns on?
Metal pipes expand as they heat up, opening tiny gaps in worn seals or loose joints that remain sealed when cold.
How do I temporarily stop a drip until help arrives?
Turn off the supply valve, bleed system pressure, and place a shallow tray beneath the fitting to catch water.
Should I repair a corroded valve or replace the unit?
If corrosion has spread to the unit body, replacing the heating unit provides a safer, long-term energy-efficient solution.
Conclusion
Pinpointing the exact source of moisture—whether it originates from a control valve, a worn spindle, or a pipe joint—is essential for maintaining a safe and warm home. While simple fixes like tightening compression nuts or replacing valve seals can address minor issues, ongoing water loss should never be ignored. Unchecked moisture leads to costly structural damage, reduces heating efficiency, and places unnecessary strain on your heating boiler.
If you frequently find yourself managing a leaking radiator, temporary repairs may only delay the inevitable. Modern heating units offer superior heat distribution, improved energy efficiency, and reliable performance that protects your home from unexpected moisture issues. Taking proactive steps today ensures consistent comfort, lower energy bills, and complete peace of mind throughout the winter months. Take time to inspect your system, address small issues promptly, and consider upgrading outdated units to keep your home running smoothly.